
Canva for Kids
For information about Coder Kids classes and camps, including online coding and gaming topics, visit register.coderkids.com/onlineclasses.

Canva is a graphic design platform used to create all different types of visual content. You can make flyers, banners, social media posts, cards, business cards, infographics and more. Canva is user friendly and a great way for kids (and adults) to learn the basics of design and create fantastic content that they will actually want to use. In this post, we’ll go over the basics of Canva for kids and go over a couple of fun projects kids can start with.
Basics - Canva for Kids
To get started using Canva, you’ll need to set up an account using your email and any password you choose. This way when you sign in, you’ll always have access to all of your designs and any files you uploaded previously. Be sure to ask your parents if it’s ok to set up an account on Canva.
One of the best things about Canva is that you can create beautiful content for free! There is a paid version (Canva Pro), but I have found that I’ve been able to design to my heart’s content using the free version. Sometimes it takes a little longer to find what you are looking for using the free options, but especially for kids, the free version offers plenty options to explore.
Types of Designs
It seems like there is an almost endless amount of designs you can make on Canva!
Canva has several design options to choose from: flyers, bannners, resumes, invitations, business cards, labels, t-shirts, presentations, invoices, websites, instagram posts and stories, facebook posts and videos, pinterest pins, youtube thumbnails, postcards, logos, menus, posters, infographics, certificates, stickers, letterheads, brochures- the list goes on and on and on!!
And they also offer the option of using a custom size for your design. You can choose the size in inches, centimeters, millimeters or pixels.
Getting Started
The first thing you’ll need to do to get started is to choose whay type of design you’d like to make. To do this, you can click on the picture representing your design, or you can click on “Create a design” in the top right corner. If you do this, a drop-down menu will appear with options. You can choose from these, or start typing in the search bar until you find what your’re looking for. This is also where you can choose “Custom Size” at the bottom. If you do this, be sure your measurements are listed in the correct mearsurement unit.

Templates
Now it’s the fun part! Once you’ve chosen the type of design you want, you’ll come to the work page where you’ll actually get started.
On the left hand side of this page, you’ll see a vertical menu. The first item is “Templates.” When templates is chosen from the menu, on the right a gallery of templates will appear. You can look through all of these templates and choose one to use for your project.
If there is a crown on the bottom right corner of the template, this means that it is only accessible using Canva Pro (the paid version). There are plenty of templates that come with the free version, so just keep looking. Some of the paid templates are only paid if you use the photo included in template. If this is the case, just change it for a free photo and you’ll be good to go.
Keep in mind that with a template, you’ll be able to change photos, elements, colors and fonts, etc. It’s like a guide to get you started.

Elements
Elements is the next section in the vertical menu on the left side. Elements include photos, lines, shapes, graphics, videos, charts and frames (to add photos in a specific shape).
The template you chose will already have some elements included. You can keep these, delete them, change their color or size or add more elements. In order to work on a specific element, click on it on the work page and it will become highlighted. Then you can:
Delete it - hit backspace
Change the size - drag it out by the corners or vertically/horizontally, click “Crop” in the top menu bar to make it smaller
Change the color - (some elements you can change the color, some you can’t) the top menu bar will have a square with the current color inside, click on this to have a choice of colors.
Flip- click on the top menu bar where it says “Flip.” You can flip the element horizontally or veritcally
You can also search through the different types of elements and find ones that you want to add to your design. Remember that the crown in the corner means you need the paid Canva Pro version to use the element.
You can also choose stock photos to use in your design. You can search for a certain type of picure that you’d like for your design. For info on how to find free photos quickly, check out this blog post.

Uploads
Uploads is next in the left hand side vertical menu. This is where you can upload your own photos or other files that you want to use in your designs.
Click on “Uploads,” and then choose “Upload Media.” After this, it will give you a choice from where to upload your media from. I usually am uploading a photo from my computer, so I choose “Device” and then select the file I want uploaded. After it is uploaded, it will stay in your upload section forever (unless you decide to delete it).
Text
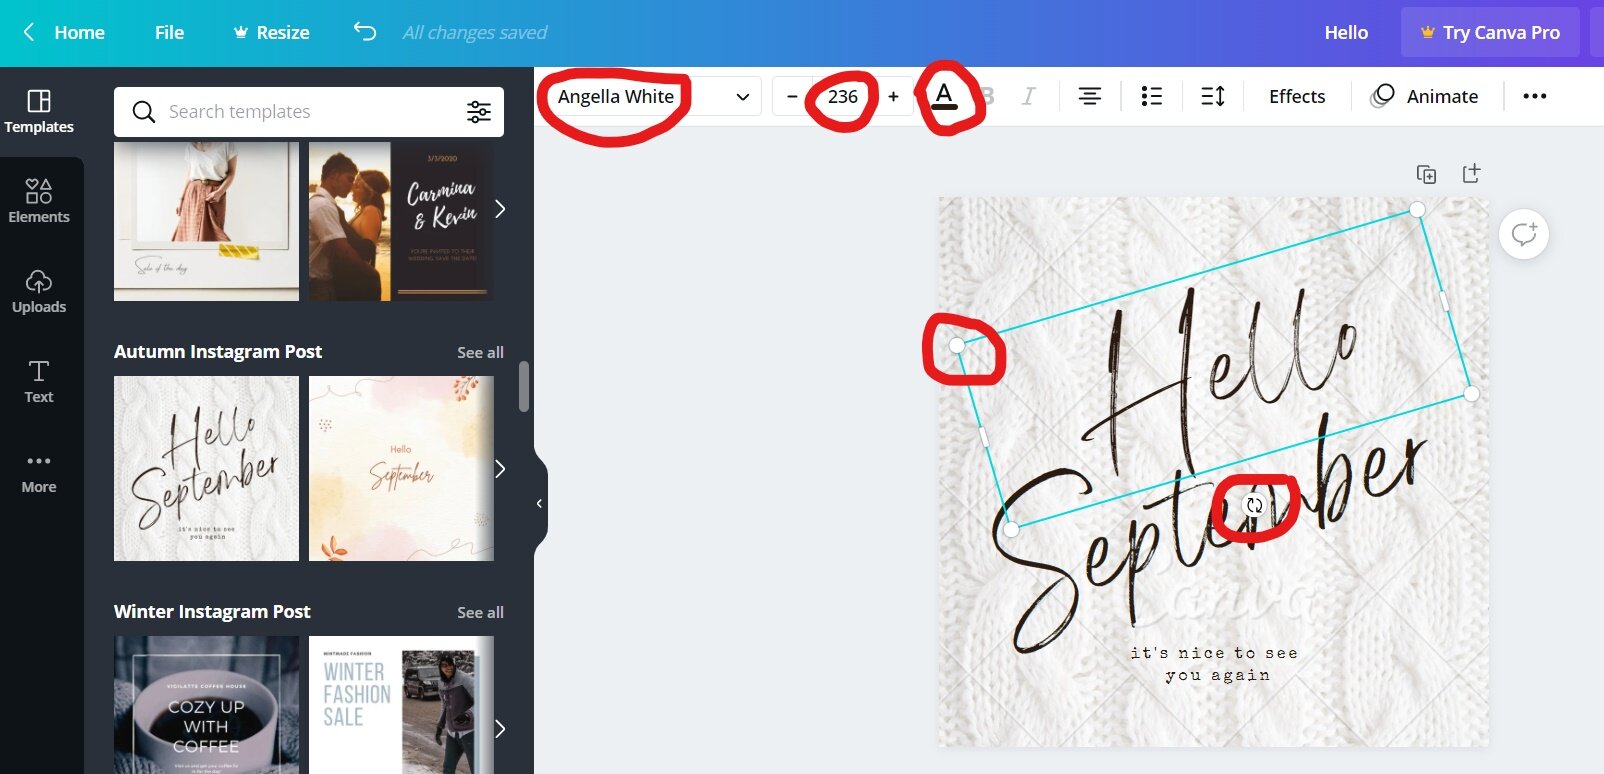
The huge variety of text options in Canva is one of my favorite parts about it! If you are working with a template, and you want to change what they have written, click on the writing, and delete what is there. Then you can fill it in with what you want it to say. You can change the size of the wirting by either using the corners to expand or decrease it’s size, or you can change the font size manualy at the top. This is also where you can change the font color. You can change the angle of the text by using the curved arrow that appears when you’ve clicked on that text section. You can also change the actual font at the top if you’d like as well.
You can also add text manually. To do this, click on “Text” on the left vertical menu. You’ll have options to add different headings or use pre-made font combinations. You can move these texts anywhere you’d like on your design, change the angle, color, size and actual font.
To select a font, you can search manually, topically, or just scroll down the list until you find one you like. Remember, just like with the elements and templates, a crown means you need Canva Pro to use that particular font.

Saving and Downloading
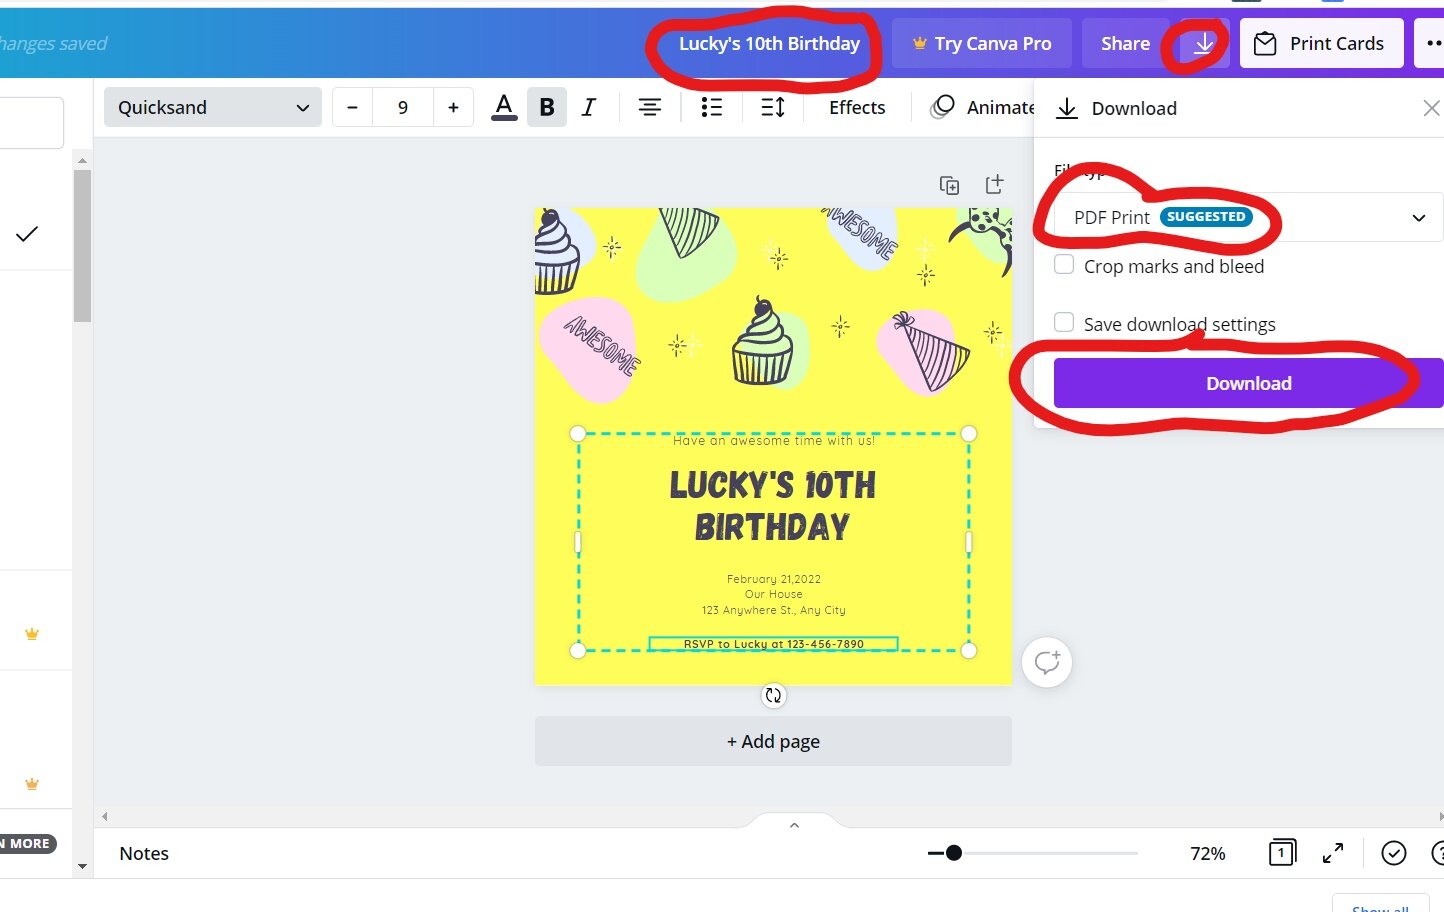
The last basic of Canva for Kids we’ll go over is saving and downloading your designs. You can name your desings on the top of your screen. In the upper right corner, you’ll also see a “Download” button. When you are done with your design, click “Download.” A drop down menu will appear. It will have a suggested file type to download your design as (usually a PNG or PDF). You can use this file type, or click on it and select a different one. Then be sure to click the “Download” button at the bottom.
Then your design will be downloaded to your computer. You can print it, send it or post wherever you’d like!
Beginner Projects
Now that we’ve gone over the basics of Canva for Kids, let’s get started using our skills! In this section, we’ll make a kid-friendly Party Invitation and an Instagram post.
Party Invitation
1. Select (or type into the search bar) “Invitation” for the design.
2. Choose a template. For this example, I typed “child’s birthday into the template search bar and chose the template below.


3. I decided to change the back ground color. While the entire square was selected (see blue outline), I clicked on the color square on the top menu. Then I chose a yellow color for the new background.
4. Now I’ll change the name- Clicked on the text that says, “Sandra’s 8th Birthday.” Then I changed it to say “Lucky’s 10th Birthday”

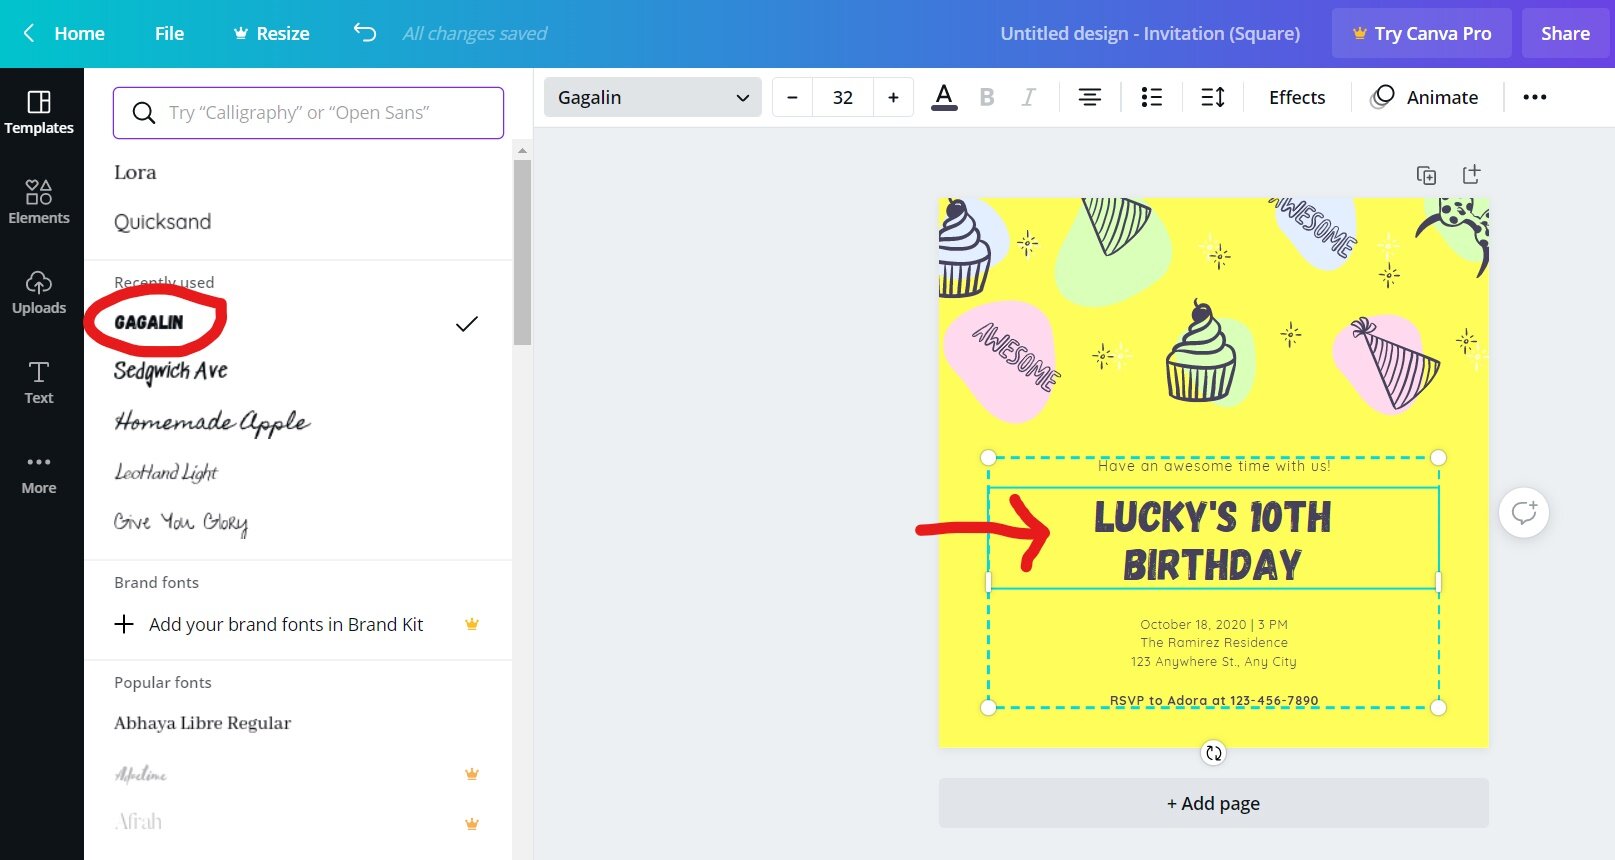
5. I decided to change the font of “Lucky’s 10th Birthday.” I highlighted the text and chose the Gagalin font. I kept the font size the same.
6. Next I put in the correct information for her birthday.

7. At this point you could change the elements (colors, sizes, delete them, add more, etc.) but I like the way it’s looking, so I’m not going to.
8. Now I named the design and downloaded it as a PDF Print (the file type suggested) to my computer and I’m good to go!
Instagram Post
Now we’ll make an Instagram post on Canva. I’m going to have this post go along with the Lucky’s Birthday invitation I made above.
1. Select (or type in the search bar) Instagram post for the design.
2. Choose a template that you’d like to use. For this example, I decided not to use at template.
3. Upload a photo of Lucky- I chose “Uploads” in the left veritcal menu, then clicked on “Device.” I chose the file from my computer that I wanted to upload and waited for it to appear.


4. I dragged the uploaded photo of Lucky over to the design work space. I did this so that the photo would fill the entire design (If I had just clicked on the photo, it would appear on the design, but smaller. I could change the size manually and get it big enough to fill the entire space that way as well) Isn’t she cute?!?
5. I added text to the design. First I clicked “Text” in the left vertical menu, then I clicked “Add subheading.”


6. I changed the text to say “Save the Date: Lucky’s 10th Birthday February 21, 2022.” I also changed the font, font size, font color and the placement of the text on my image. I changed the alignment to the left as well.
7. Then I named it and downloaded it as a PNG file (suggested type). It’s ready to post!

Conclusion
Canva is a fantastic graphic design program that kids (and adults) can use to create really cool visual content. Canva has a free and paid version (Canva Pro). We think the free version is great and has plenty of design options for kids to exercise their creativity. Hopefully our Canva for Kids guide has been helpful to get you and your kids started designing away!


As an Amazon Associate, Coder Kids earns from qualifying purchases.