
Python Projects for Kids
For information about Coder Kids classes and camps, including online coding and gaming topics, visit register.coderkids.com/onlineclasses.

Searching for some fun, beginner-friendly Python Projects for Kids? Look no further! We’ve got you’ve covered!
Today we’re going to learn a couple fun, but simple python projects for kids. While doing this we will learn about several python imports. However before we get to the projects, first we’ll set up our python IDE. A IDE is a way for us to compile code. However, some IDE’s will not run our code because the code may be too difficult for an online IDE. The IDE we use is powerful and can easily run our code. There is one step we must do before this (feel free to skip this step if you have already done this with a previous python project).
Downloading Python
Downloading python is a very easy process. We will go ahead and download the latest version of python. To download the lastest version of python, go to the link below.
https://www.python.org/downloads/
Once you go to this link, select “download the latest version of python” (this should be the very first thing you see on the website). Once you do that you will be asked to “Install Now” or “Customize Installation.” Before you select anything you will see two check boxes below. One that asks “install launcher for all users,” and a second one under that which will ask if you want to “add PYTHON to path.” Check in both of these boxes and simply press install. Once you do this you will be able to install python onto your PC. After you’ve done this your PC should be able to run any python code you try to compile on it.
Downloading Pycharm
Now the final step before we start coding is to download our IDE so we have something to run our code on. The IDE we are going to use is called Pycharm. It is a very power IDE and it will be able to run all the code we plan to create. In order to download Pycharm go to the link below.
https://www.jetbrains.com/pycharm/download/#section=windows
When you go to this link you will have the option of downloading the community or professional version. Select the community version and when you do this, you will see a small exe file on the bottom left of your screen. There you will see a small download has started. Once the download has stopped click on it and you will be taken to a page where it will tell you the download for Pycharm is ready. Select “next.” On the next page you will see the file path where Pycharm is going to be downloaded. Unless you want to change the location simply hit “next.” You will then be asked if you want to create a shortcut, go ahead and select the 64-bit version. Make sure that you leave the 32-bit version and the box with .py next to it unselected. Once you’ve done this go ahead and select the “next” on the bottom again and you will be taken to a page with a drop down. Simply hit next and don’t change anything once you do that. You should now have an option to install pycharm. Once this is done you will have an option to launch Pycharm. You can either check the box to run it or close the finished installer and run it through the shortcut that is now on your desktop. Once you run it you may be asked if you want to import settings from a previous Pycharm download. If this happens, select no and press ok. Scroll through the terms and conditions and then select accept when you are finished. Lastly you will be asked if you want to send data to help Pycharm. Select “don’t send” and now your Pycharm should launch!
Now that Pycharm is launched you will have the option to select dark or light mode. Pick your preference and then select next. You will be asked if you want to use any plug-ins. For our code we don't need any, so don’t select any plug-ins, and simply select “Start Using Pycharm.”
Python Project #1 - Creating a Simple Guessing Game
Now you should see the option to “create new project.” Select that and then you will be able to name your new project. When naming your new project do not delete the entire line. Write over the word untitled ONLY. For our first project we will create a guessing game so to help with organization we are going to call our project “Guess.” Once you do this you will be taken to your project. On the left you should see your project name. Right click on that and you should see the option “new.” Hover over “new” and you’ll see python file. Select that and you now name it main. You’ve now created your first python file.
Setting up
The first thing we'll do is import a library to use code that is not provided in the end normal Python Library. After this we will be creating a function that will generate the random number that we will be attempting to guess (based on the difficulty that the user chooses).
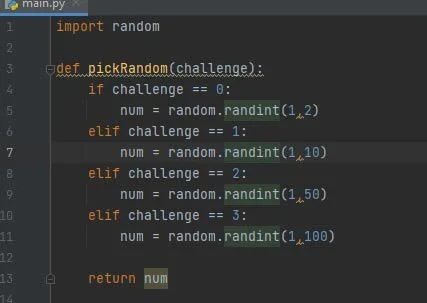
The first line of code is importing the random library. Next we will create a function that will use several linked if conditions in order to decide the range of our random number. Our first if statement will check if the challenge difficulty is set to 0 if so we will be in a range of 1 to 2. You will see that we call the random library in order to use the function randint. We use this in order to randomly pick a number between two numbers including both of those numbers. As the challenge level rises so does the number range that it selects from.
Next we will be constructing the game Loop where our game will be executed. This will include giving several prompts as well as taking input. Lastly we will also include a way to end the game or continue it.

The first thing we are going to do is create a while Loop. Instead of creating a variable in order to control this while Loop we will simply set it to run indefinitely. To break out of our while Loop we will simply use the command break which automatically takes you out of any Loop you are currently in. Our first line inside of the while Loop is simply providing a prompt and explaining to the user what we are doing by printing out whatever we put inside of our print statement. Next we are going to create a variable that will store the challenge level that the user wants to play at.
This will be stored inside of a variable called difficulty. After this we will now call the pickRandom function from earlier.
This will return a randomly picked number and it will be stored inside of our variable number. Note how after the function name we use parentheses and we have something stored inside of those parentheses. Whenever we use a function it is possible to require parameters. In the case of our pickRandom function we have a parameter known as the difficulty or challenge level. So we must pass the difficulty that the user chose in order to properly use our function. If you would like, try to take the parameter out and simply put pick Random and you will receive an error.
Next we are going to receive more input that will store the user's guess. Lastly we have an if statement that will check if our guess is equal to the number then we will simply take input again and this input will dictate whether the game continues or not. As you see in our else we do the exact same code over again however we change the prompt slightly because if the guess is not correct and we do not want to tell them that they were correct.
Python Project #2 -Creating an Alarm
Now to create a new project go ahead and select file on the top left of the screen. Now select new project and go ahead and name this project alarm because we will be creating a simple alarm using a GUI.
Creating our first GUI
The first thing we need to do is import a few features that don’t come with the original python library which should be easy just copy what I have below.

Now we can start creating our GUI. To do this we are going to be using a library called tkinter. This is a very popular library to use when creating a GUI in python. The first step is going to be creating our window. In this case we will be calling our window root. To do this we will initialize the tkinter library. Next we have a window but we are going to want to give it a name since our goal is to create an alarm clock then we will name it alarm. Now we are going to create a line of code that will give our GUI its size. Feel free to change the size as you like (the dimensions I already have work well). Below you find all three lines of code.

As you will see in our second line of code we are creating the title using the title function this is a built-in function that comes with the tkinter library. On our third line of code you will see that we use the geometry function. This function takes a string variable which is any combination of numbers or letters and converts them into a width and height for our GUI.
Next we will create a label which we will use to hold a prompt for our user to read, as well as to show the format we would like to receive our alarm. After we create our label we will be using a function called pack in order to automatically have our label neatly stored into GUI. This allows us to avoid having to manually place things onto our GUI.
Next we will create an area for our user to enter the time and a global variable that we are able to access from anywhere to store that time so that we could easily use it in our functions. You will see what your code should look like below

We will be naming our label “label1.” Our label has two inputs: the GUI itself as you'll see we put root , then secondly it will take the text that we would like to present to our user as a prompt. Next we will add entry1, capital E entry is a special function in the library that allows us to add an entry to our GUI.
Next we will be adding a button to our GUI that will allow us to execute the code. We will be creating another label that will say Time until alarm to show to our user the time till the alarm goes off. Now lastly we will be adding a line of code that will allow our GUI to run.

As you will see on our first line we are using the button function. This has several inputs, however we will not use them all. The first one is entering the GUI itself which is root, the next input we will add our text which will be enter. Then we will add a width of 10 (this can be increased if you want to). All it does is allow you to choose how wide the button will be. Lastly we will be adding something to command later. This is the action that executes after we select our button. Now we have label2 which will be similar to label1. However, this time we will be adding a special font and background just to make our alarm look a little better. Next we add root.mainloop which is simply running our GUI. Also take note to how we used pack after each button or label was created to make sure our GUI looks nice.
Setting up our time
You can now run your code to test it. Next, we will be creating a small function to make sure that we do not run into any errors along the way. All this function will do is pad any single digits with zeros before them (because the basis to how we will be calculating the time requires that we are using two digits even if those numbers are zero).

How this function works is that it takes a string value in the format HH:MM. It simply converts that value into two individual integers by cutting our string into two pieces. These pieces will represent our minutes and our hours. Inside you will see that we are using try and except structures. The reason why we are using this is because it is expected we will receive errors and the except will allow us to run through those exceptions instead of simply crashing our GUI. Also please note that our function is placed below entry1 and above enterButton if it is placed anywhere else, you will likely experience errors.
Next we will be getting the difference between our alarm time as well as the current time. Here we will be recasting several variables from strings to integers. While some of this code may look complicated, in reality all we are doing is subtracting our alarm time from our current time. In some cases, we would receive negative numbers (for example if our alarm time is less than the current time). We can avoid this simply by adding 24 when dealing with our hours or 60 when dealing with minutes and seconds.

The very first thing we are doing here is typing Global entry1. This will allow us to access our earlier entry 1, which if you remember, is our alarm. From there we will convert our alarm time into a string and pass that to our add zeros function. This will return our alarm minutes as well as our alarm hour. You can see below that we have secTill which is simply the current seconds. Then we will make some adjustments for special cases such as our minutes or seconds starting at 0. Lastly we will be creating an if statement that will catch any potential negative numbers. Now on the last line you will receive an error and that's okay. The reason you are getting that error is because we have not created that function yet. Also note that here we are using the time import from earlier.
Main loop
The next thing we will do is create our find time function. The goal of this function is to constantly find the difference between the current time and the alarm that we have set. How we will do this is by accessing our entry1. Then simply waiting one second and then updating the second and checking if we need to update our minute and if so, our hour. We will then convert these numbers into a new string and store that into entry1, now updating the time till our alarm goes off.

Above you'll see entry one is being stored into the variable timeLeft and this variable is then being passed into our addZeros function and the minute and hours that are returned are stored into minLeft and our hourLeft. Here we will now check for our time and you will see that we are using the same try and excepts from our addZeros in order to make sure that we are avoiding any possible errors. Here you'll see that we are only treating a seconds left and that is because minutes and hours are calculated in addZeros.
Next we will be updating label2. If you remember from the beginning we created a label that is meant to hold the time left until our alarm.This label is updated using the config function. The config function will take one argument which is the text that we are updating. We will then be replacing the text with the time left until our alarm. Next we will have a if statement that will check if the time till the alarm has reached 0. If this time has not been reached then we will recall the same function using the after function. The after function takes two inputs. The first input is the time we wait in milliseconds and the second input is the action we want done after the number of milliseconds has passed.

Now inside of our if statement we are executing what we want to happen once our alarm time has been reached. We want the code inside of the if statement to randomly select a url that we have stored inside of a text file that we will create after this. We will use the random import from earlier to randomly pick between two numbers. Those numbers will be 0 and 1 minus the total number of urls you have stored in your text file.Once we've picked our url we are going to go ahead and use the webbrowser input to now automatically open that url. The last step is destroying or closing our GUI.
Now to create our text file is very similar to how we created our python file. We will simply right click on alarm and select new then click on file which should be the first option. We will then name out text file links. Now you are free to add any url that you prefer. I typically use links from YouTube for music or anything else I may want to play. Below you will see an example of what your text file should look like.

Conclusion
We hope you found out Python Projects for Kids tutorials helpful! Did you try the projects? How did they work? Let us know in the comments!


As an Amazon Associate, Coder Kids earns from qualifying purchases.