
Scratch Projects for Kids
For information about Coder Kids classes and camps, including online coding and gaming topics, visit register.coderkids.com/onlineclasses.
Here at Coder Kids, we love Scratch! We think it’s a great programming language to introduce kids to coding, plus it can be used for simple and complex games and animations! Scratch also has an awesome community where kids can share their work, make friends and learn from others! Keep reading to learn more about Scratch, and 3 step-by-step Scratch Projects for Kids!
How Scratch Works
Scratch is a programming language designed by MIT to help kids learn how to code. It is free to use and it’s easy to set up an account. Scratch is a block based coding language, This means that instead of typing every command, in Scratch, you use a specific block for each command and snap it into place with another block (many of the blocks can be customized for your particular project). Although Scratch is not a “professional” coding language, it’s a great way to introduce kids to coding. It teaches them the fundamentals of coding in a fun, creative and visually pleasing way.
If you are unfamiliar with Scratch, check out our Scratch At-A-Glance Glossary. This glossary has some common scratch vocabulary and their definitions.
Let’s take a look at 3 Scratch Projects for Kids! If you’re looking for some other basic coding projects for Scratch Jr, check out this blogpost (it has 7 projects for you to try!).
Scratch Project #1": Animate a Name
This is a great project for beginner coders. You can watch the video tutorial from Scratch here.
Here are the basic steps:
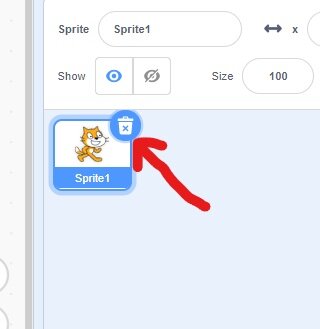
1. Delete the scratch cat sprite.
This is pretty straight-forward. Just click on the little “x” in the garbage can next to the cat sprite.
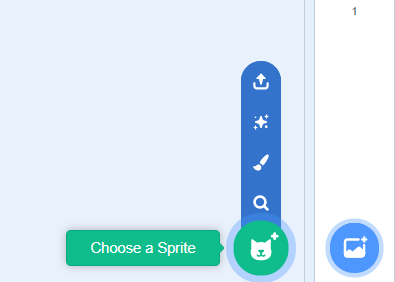
2. Add the letters of your name as sprites.
To add a sprite, click on the cat head with a plus sign towards the bottom right corner. Once you do that, click on “letters” (top right). Then click on the first letter of your name. Continue this process until you have added all the letters of your name.
You may also want to move you letters so they are spaced in a different way. Just click on the letter and drag it to where you want it to start.

3. Add events to make each letter do something different.
This is where things get exciting, and we start to code! You can be totally creative here! I’ll give you some examples, but be sure to explore all the options!
First, I’ll code the “S” to change colors.
Click on the small letter below the stage so that you are coding for the correct letter. To start out, I’ll need to use the yellow-orange block that says “ when (picture of a green flag) clicked". This is a really important coding block becuase it tells my project when to start doing stuff. I’ll drag that block to the coding area.
Then I’ll click on the “looks” circle (purple) and find the “change color by 25” block. I’ll drag that over and click in underneath the green flag block. Click the green flag and watch the color change! (press the stop sign to reset the project).


I’m also going to add a “wait __ seconds” and a “repeat __ times” blocks to my letter S. This way, when the green flag is clicked, the color will change 10 times!

Now I’ll make the “A” spin!
To start, I’ll click on the “A” so that I’m coding for the correct sprite.
Then I’ll add the “when (green flag) clicked block. To make it spin, I’ll add the “move __ degrees block” (it’s a blue block in the Motion section). I changed the degrees to 90 so that it will be easier to have it spin all the way around.
Then I’m going to add the “repeat __ times” block. I’ll have it repeat 4 times so that i get one full rotation!

How to make the “R” pop with sound!
Now I’ll click on the “R” to start coding it.
I’m going to add the “when this sprite clicked” block.
Then I’ll add some sound! I’ll drag the “play sound pop until done” block over. Now when you click the “R” it makes a pop sound!

Making the “A” grow and shrink.
I’ll work on the second “A” now. I’m going to make it change sizes. Be sure to click on the letter so you’re coding the right one!
Now I’ll add the “when (green flag) clicked” block. Then I’ll go to the “Looks” section and drag the “change size by__” block.
I’m going to add the “wait __ seconds” block under that. I’ll edit the time so that it waits 0.25 seconds.
I’ll add another “change size by__” block and edit it to -10.
After that, I’m going to add the “repeat __ times” block around them so that my “A” changes sizes a bunch of times!

Make the “H” Disappear!
First, I’ll click on the “H.”
Then I’m going to add the “when (green flag) clicked” block.
Under that I’ll add the “change color by __” block. I’m going to click on color to the drop-down menu and select “ghost.” And change the number effect to 25.
Then I’ll add a “wait __ seconds” block. For this I’m going to choose 0.25 seconds.
And last, I’ll add the “repeat __ times” block. I’m going to choose 4 times so that the “H” will completely disappear (since I’m changing it by 25 each time, if it happens 4 times, then it will be 100% ghost).

4. Add a cool background!
To add a background, click on the “backdrops” button in the bottom right corner. This will take you to all of the backdrops Scratch has for you. Just click on the one you like, and it’ll be there!
Of course, you should play around on Scratch and explore all the cool things you can do with this project, not just what we did in the examples. If you can think of it, there’s a way to do it! Trying out new things is how you learn and develop your skills from basic to advanced!
Scratch Project #2: Mega Maze
If you’re a beginner, you can use this maze template from the Scratch Team. If you’re not, you can make your own maze template drawing your own shapes.

1. Click on Remix to start coding your maze.

2. Code the ball to move when you press the arrow keys.
You’ll notice that some of these are coded (the side to side arrow keys), but you’ll need to change some things for the up and down arrow keys.
To make your ball move down when you press the down arrow, you’ll need to change “point in direction” so that it’s pointing the correct way. In this case, it’s 180.


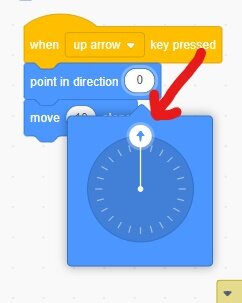
Then, you’ll need to do the same thing for the up arrow, except you’ll change the “point in direction” to point up, which is 0.
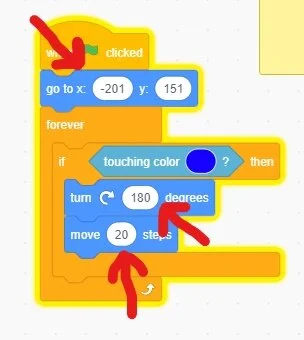
3. Code the ball so it bounces if it touches the blue wall.
As with other parts of this template, part of the code is already set up for this, but it will need to be modified.
I added a “go to” for the coordinates (location I always want my ball to start at when the green flag is clicked.
I changed the degress the ball turns when it touches the blue to 180 so that it doesn’t get stuck in the blue if i keep pressing the arrow that will make it touch the blue (if you don’t do this, your ball can get stuck spinning in the blue area- you can try and see it before you adjust the code).
I also coded my ball to move 20 steps instead of just 10.

4. Code your ball to change colors
Your ball is already coded to change colors every time the space bar is pressed, but you can change it to a different button (you could even make one of the arrows change the color so that the color changes a lot while you’re playing!).

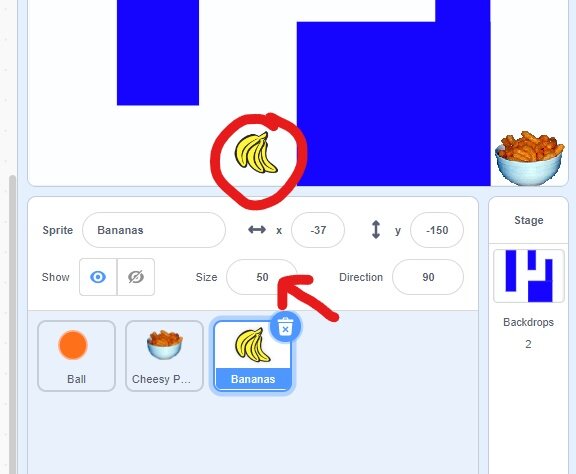
5. Add another obstacle
To add another obstacle to your maze, first you’ll need to add a new sprite.
Choose whatever sprite you’d like.
Then you’ll need to change the size of your obstacle so that it fits into the maze (not too big that you can’t get around it, but not so small that it’s too easy). Put your oblstacle wherever you’d like!
Then you need to code the ball to go back to the beginning if it touches your new obstacle. You can also code the ball to bounce off of your obstacle like it does from the blue, if you like that better.

6. Change the background when you reach the cheesy puffs
Now we’ll code the background to change once the ball reaches the cheesy puffs. In this example, we’re going to have it be the end of the game and a “Winner” background. But, if you’re ready to keep going and keep coding, the new background could be another maze and you could add as many stages as you want!

First, I want to be sure that when the green flag is clicked, it always starts with the maze backdrop.
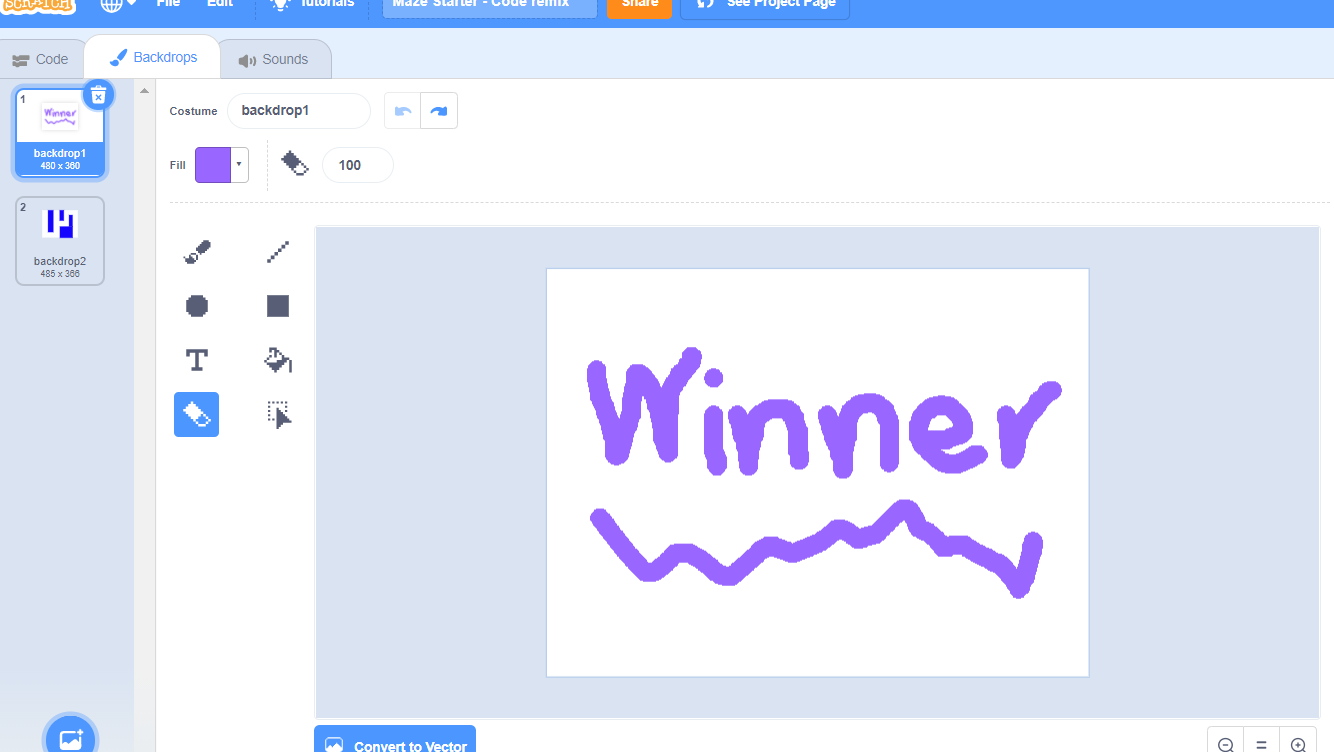
Then I’ll click on the backdrop on the right bottom side. Next, I’ll click where it now says “Backdrops at the top.


I’ll click on “backdrop1” which is blank. Then you can draw or type winner to this background.


And finally, I’ll code the background to change from the maze to the “Winner” backdrop when the ball touches the cheesy puffs.

Here’s a picture so you can see what it looks like when someone finishes this maze!
Scratch Project #3: Keep it Up
This game is a little more complicated, but it’s worth it! It’s a fun game kids can share with their friends! This game is like a video game version of “keep the balloon off the ground.” You choose your paddle and your balloon (both of these can be any sprite you’d like) and then we code accordingly.
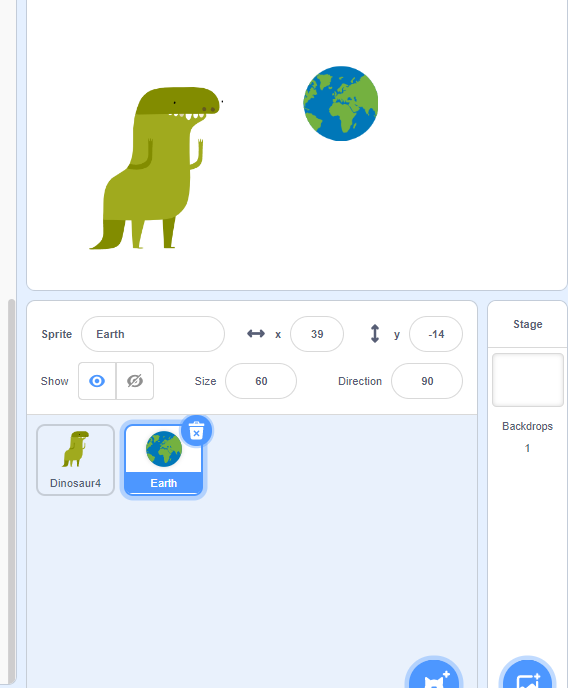
1. Delete the cat sprite and choose you paddle sprite and your balloon sprite.
I chose a dinosaur and the earth (I did change the size of the earth to be smaller)


2. Draw a line at the bottom of your background
(we’ll need this line in order to code for the game to end if the earth touches it)


3. Code the dinosaur
(or whichever sprite you have as your “paddle”) to move with the arrows, and to start in the same place each time the green flag is clicked.


4. Code the earth to start at the same point when the green flag is clicked
(be sure you click on the earth so you aren’t coding the dinosaur anymore!

5. Code the earth to bounce off the dinosaur and glide somewhere random.

6. Code the earth to bounce from the edges and move random places.
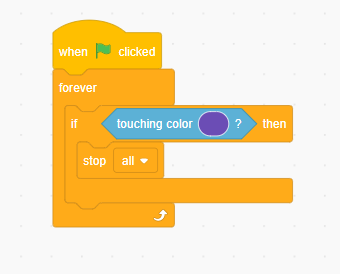
7. Code the earth to stop if it touches the bottom color.
There is a cool little trick to get the “touching color” to match the color you drew perfectly. First, click on the color within the blue block. A drop-down menu will appear.
Once you see the menu, click on the very bottom icon tht looks like an inkwell.
Then go to the color you want to select and click on it! Viola! Perfect color match!


8. You can code the background to change if the earth touches the purple strip.
For step by step instructions on how to make a new backdrop, refer to step 6 in Project 2.
Be sure to code your project to start with your first background each time the green flag is clicked.


Conclusion
We hope you enjoyed making our 3 Scratch Projects for Kids! Be sure to follow Coder Kids on Scratch! Our username is CoderKidsTX. We’d love to see your versions of these projects!
If you’re ready for even more coding, this blogpost can help!


We are a participant in the Amazon Services LLC Associates Program, an affiliate advertising program designed to provide a means for us to earn fees by linking to Amazon.com and affiliated sites.